Companies
Learn how FlexPay's Companies feature enables you to segment your data, customize recovery strategies, and streamline reporting across various areas of your business.
In FlexPay, a Company is a subdivision of an account. This feature is useful for merchants who want to separate traffic by brands, divisions, or products.
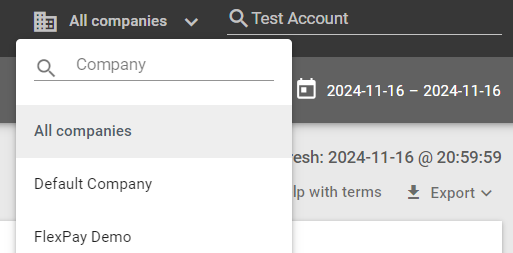
To switch between companies, simply select the one you need from the Companies menu located at the top-right corner of the Client Portal, next to the account name.

Important
To leverage multiple companies, your CRM must be able to send transactions using different API keys. The API key is how FlexPay identifies which company a transaction belongs to.
Benefits of Using Multiple Companies
One of the benefits of using multiple companies is the ability to view reports either as a combined, holistic view, or filtered by individual companies. This allows you to focus your analysis on a specific part of your business that interests you at a given time
Creating multiple companies also offers flexibility in managing your payment recovery strategy. A key advantage is the ability to configure different recovery settings for each company. For instance:
- For Product A, you might follow the recommended recovery period of 30 days.
- For Product B, you might prefer a shorter recovery window of 20 days due to business-specific reasons.
This flexibility ensures your recovery settings align with your business needs for each product or service.
Default Company
When an account is created in FlexPay, a Default Company is automatically generated with the name "Default Company." Even if you do not plan to segment your data, you must select a company when adding payment gateways or creating API keys.
To learn more about managing payment gateways, refer to the Payment Gateways page.
To learn more about generating API keys, visit the Integrations page.
Tip
Rename your companies to meaningful names that align with your business structure for easier identification and reporting. This includes renaming the Default Company to something more descriptive, such as the name of your primary brand or division.
Add a Company
As an Account Administrator, you can add additional companies to your FlexPay account from the Companies section, located under Account Settings in the left-side navigation menu. To add a new company, follow these steps:
- Click ADD COMPANY
- Enter the company Name and Code. We recommend the code be a 3 to 6-letter value that is easy to recognize.
- The Company Code is a mandatory field but will only be used for Quickstart Integrations. See the Quickstart section of this document for more details.
- In the Gateway Routing section, you can override the current account configuration. If the account is configure for routing, you can tick the checkbox and select Routing disabled from the routing mode dropdown.
- To learn more about routing, please see the Platform Configurations. page.
- Click ADD COMPANY to save the new company.
Update a Company
If you need to modify a company’s details or configurations, follow these steps:
- Log in to the Client Portal and navigate to Account Settings > Companies.
- Locate the company you wish to update, click the three dots on the right side of the screen to open the options menu and select Update.
- In the Manage Company screen, make the necessary changes.
- Click SAVE COMPANY to apply the updates.
To modify recovery settings for a specific company:
- Click the name of the company you want to update.
- In the Company Details section, you will find two tabs: DETAILS and COMPANY CONFIGURATIONS.
- The DETAILS tab provides a quick overview, including Name, Code, Date Created, and Date Modified.
- The COMPANY CONFIGURATIONS tab allows you to customize recovery settings.
- Click EDIT RECOVERY CONFIG in the COMPANY CONFIGURATIONS tab.
- Adjust settings such as maximum retry dates, amounts, and more. These settings are explained in detail on the Platform Configurations. page. Any changes made here will apply only to this specific company.
- Once you've completed your changes, click SAVE CONFIG to finalize them.
Important
Before making any changes to the recovery settings, we strongly recommend reaching out to your Client Success Manager (CSM) or our Support team. They can guide you to ensure the adjustments align with your business goals and do not inadvertently impact your recovery performance.
Delete a Company
If you need to delete a company from your account, please follow these steps:
- Log in to the Client Portal and navigate to Account Settings > Companies.
- Find the company, then click the three dots on the right side of the screen to open the options menu and select Delete.
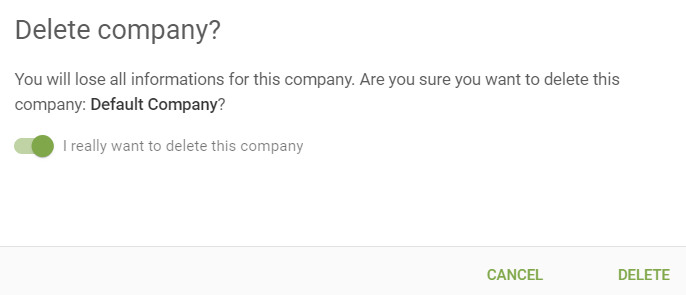
- In the confirmation screen, toggle the option "I really want to delete this company", then click DELETE.

Deleting a company will also remove all API keys associated with it.
Note
Please note that deleting a company does not remove any transactions. However, transactions previously associated with the deleted company will display as 'N/A' in the Company field.
Quickstart Integration
For Quickstart integrations, which rely on flat files and SFTP servers, there is no API key to indicate which company a specific file belongs to. Instead, the Company Code is used to identify the intended company.
The file name must follow a specific format that begins with the Company Code. This ensures FlexPay processes the file under the correct company. Let's see an example:
If you have two companies:
Product1 with the Company Code Prod1
Product2 with the Company Code Prod2
To have FlexPay process a file under Product2, the file name must start with Prod1. For example:
Prod120241120000000.txt
Ensure the file name adheres to the standard naming conventions outlined in the Quickstart Integration guide.
Updated 11 months ago
