
Maxio
Introduction
This guide is required for enabling the FlexPay recovery engine to operate with Maxio's subscription service. Once the configuration is complete, Maxio will use webhooks to notify FlexPay when an event happens. FlexPay will then trigger the next retry attempt at a specific date and time based on the recommendation from our AI-machine learning engine.
Enabling the integration
This guide requires you have your FlexPay account already setup. If you have not done this, please contact your Client Success Manager, or send an email to [email protected].
There are six steps required to complete your integration.
- Get Maxio account information
- Configure Maxio Dunning and Retries
- Create your "Companies" in the FlexPay portal
- Configure the Currencies for your account
- Add the Maxio Integration
- Configure the Maxio Webhooks
1. Get Maxio account information
The setup requires a list of data points configured in the Maxio Platform:
- Subdomain: Used to generate a unique Maxio URL.
- Currency: One currency is defined on each Maxio Site.
- Shared Key: Used to secure the data exchange between Maxio and FlexPay.
- Dunning final action: Maxio Retries and Dunning system can configure how to handle the subscription state when the dunning is completed. Maxio Dunning Reference
- Maxio API Key: One Maxio API key is required to retry and cancel subscriptions.
- Payment Gateways: Provide your Client Success Manager with a list of all payment gateways (ex: Stripe, NMI, etc.).
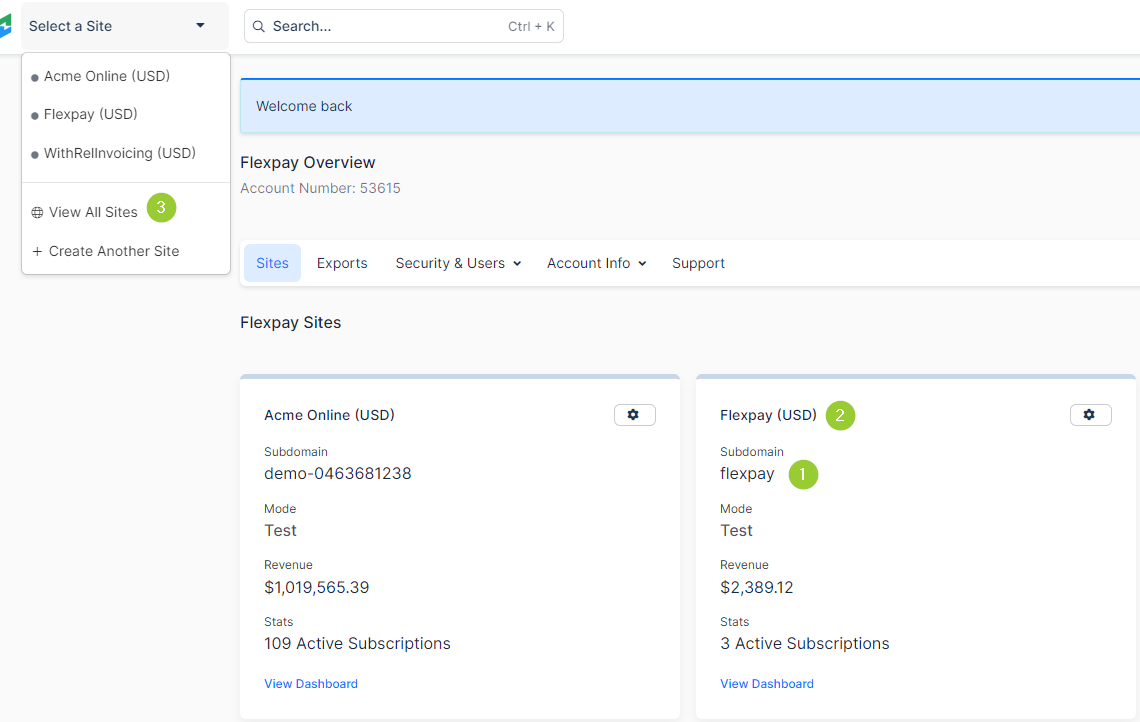
To retrieve the “Subdomain” [1] and the “Currency” [2] you need to log into the Maxio site and gather the information from the Tile. If you need to return to the dashboard, you can do it by using the top-left drop-down and clicking on View All Sites[3].
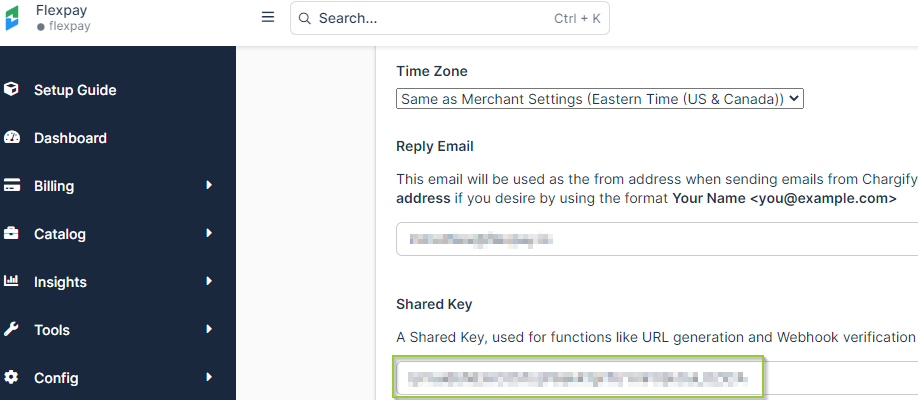
To retrieve the Shared Key, click on the gear icon of your site and select Edit Site. Scroll down and copy the value under Shared Key.
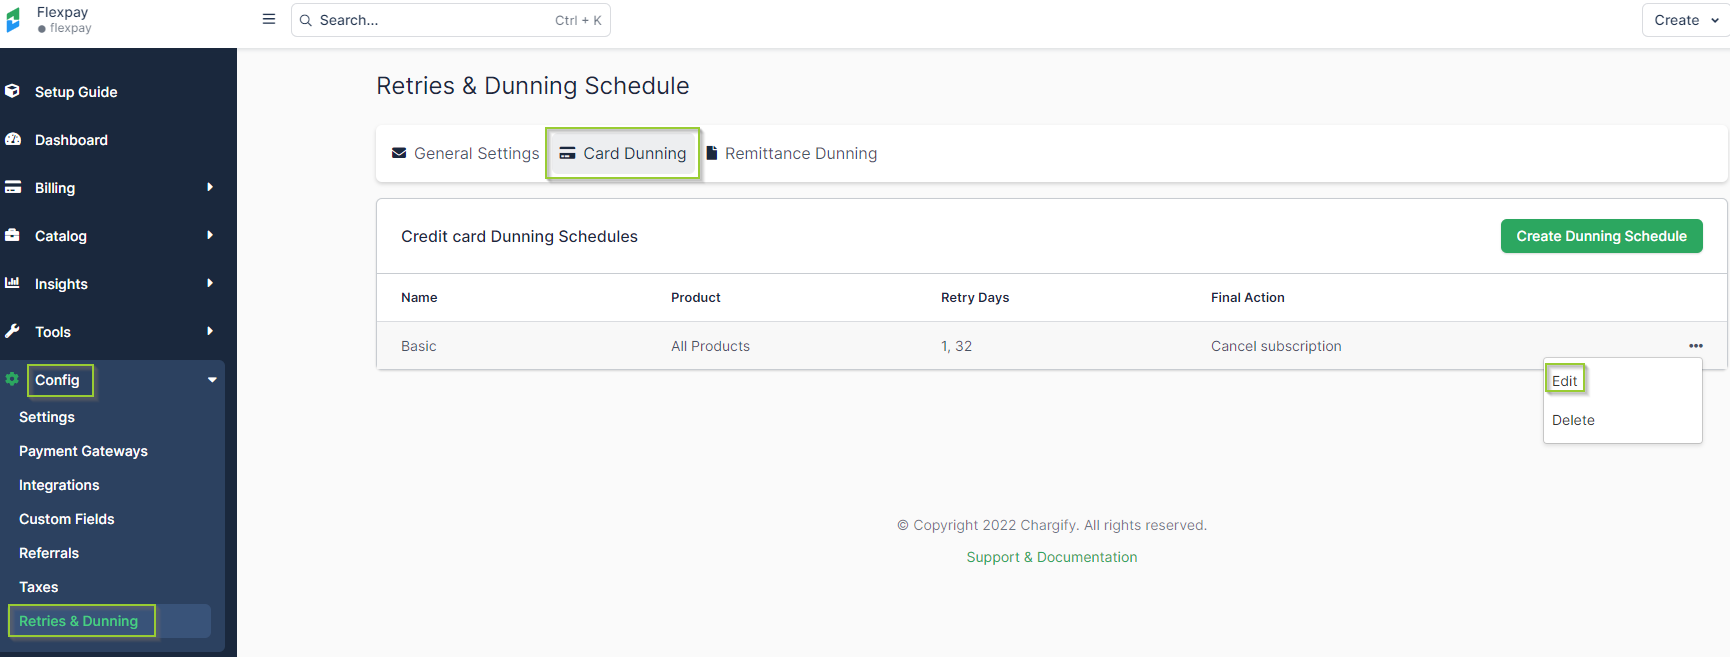
We need to retrieve the current dunning configuration. It is possible that no dunning is currently configured and, in that case, this Step can be skipped. From the navigation menu, go to Config > Retries & Dunning. Then Select the Card Dunning option. From the existing schedule, click on three dots and select Edit. Go to the Final step and take note of it.
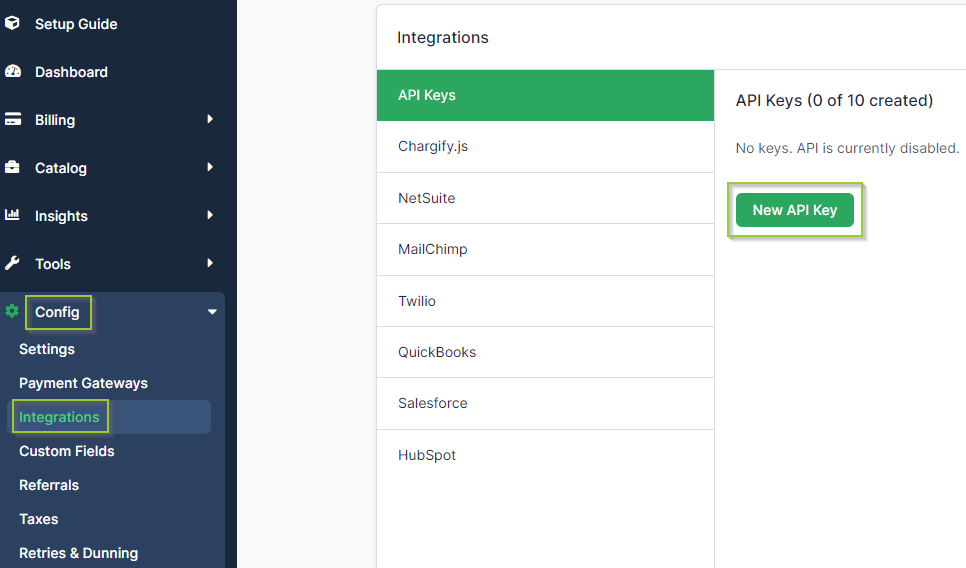
Now we need to create an API key. Go to Configs > Integrations using the navigation menu. Select the API Keys menu and click on the New API Key button. A screen will pop up and you must copy what is displayed under the Your API Key field.
We need to know which payment gateways are being used to confirm that they are properly supported by FlexPay. Go to Configs > Payment Gateways using the navigation menu. Make a note of all the connected gateways and send the list to your client success manager.
2. Configure Maxio Dunning and retries
We need to configure Maxio dunning and add an endpoint to send transactions to FlexPay.
-
In the Maxio portal, using the top-left drop-down, select the appropriate Site.
-
You must configure the Maxio retries and dunning to match the FlexPay system.
If there is a dunning strategy already configure
- Go to Configs > Retries & Dunning using the navigation menu.
- Select the Card Dunning option.
- From the existing schedule, click the three dots and select Edit.
- Go to the Final step, click the three dots and select Edit.
- We need the value selected for the Final Action: Mark as Unpaid or Cancel Subscription
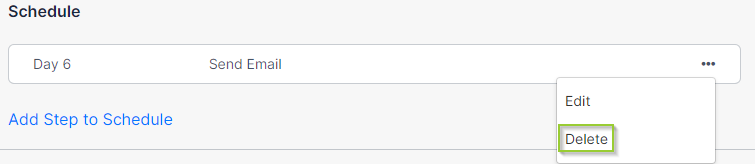
- The First Step and the Last Step are the only ones required. We need to remove any additional steps by clicking on the three dots, then the Delete button.
- Make a note (or take a screenshot) of all existing Steps
If there is not a dunning strategy already configure
- Go to Configs > Retries & Dunning using the navigation menu.
- Select the Card Dunning option.
- Click on Create Dunning Schedule.
- Select Custom Dunning Schedule
- Please provide a meaningful name, we recommend you use "FlexPay Dunning".
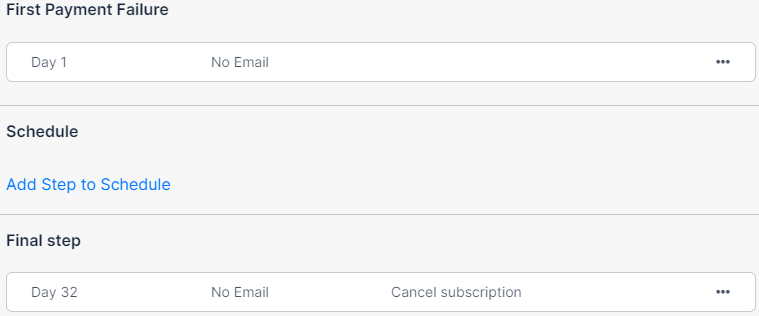
- The First Payment Failure should look like this (No Email)

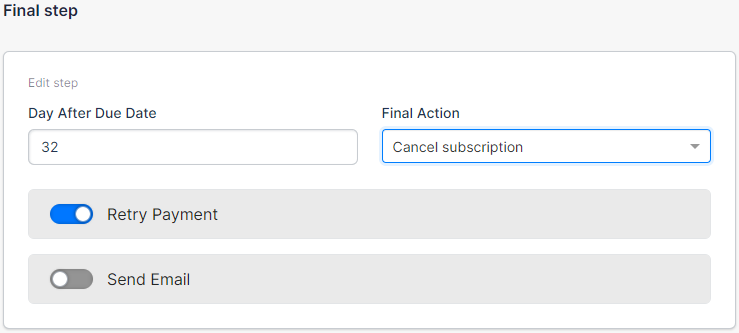
- Configure the Final Step by clicking on the ellipsis button of the Final Step and click Edit. The Day After Due Date must be set to 32, the Final Action must match the one configured in Step 1.3, Retry Payment must be checked and the Send Email option should not be checked. Then click Save Step.

Note
Regardless of any previous dunning strategy, the final result should have 2 steps and must look like this:
The FlexPay retry logic will disable the capacity to send emails while using the dunning workflow We want all dunning steps to be configured with the value No Email
3. Create your "Companies" in the FlexPay portal
When adding your companies, you need to create one per Stripe account. Please follow the regular process as described in the Companies section of the Client Portal guide.
4. Configure the Currencies for your account
To add currencies to your account, you must complete the following steps:
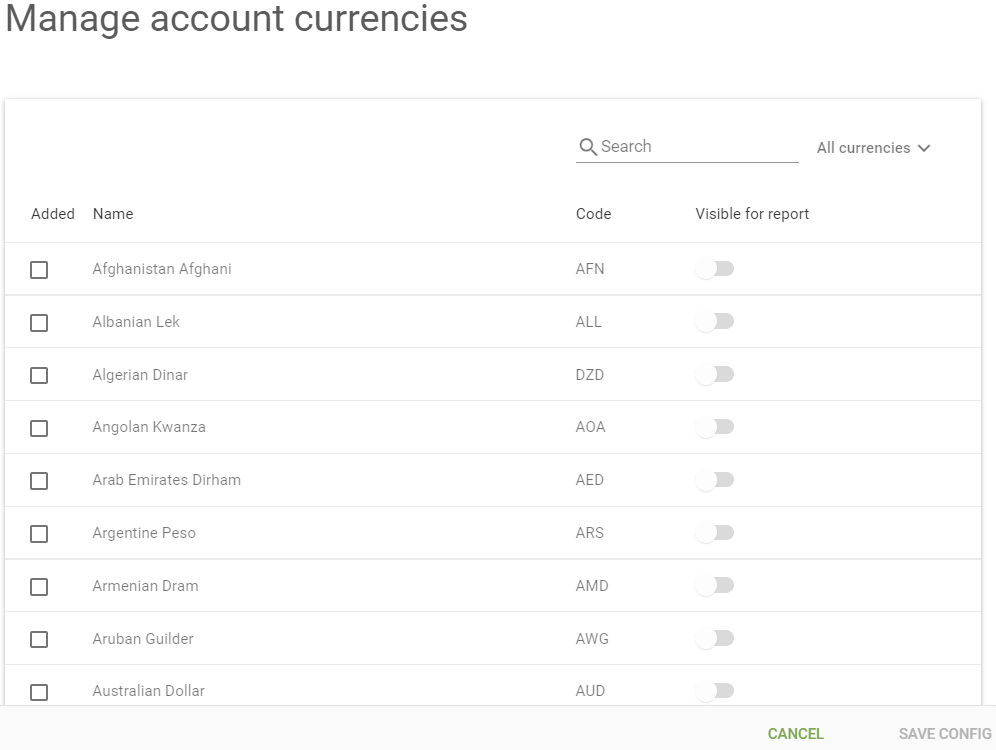
- Go to Account Settings > Platform Configurations under the admin section of the Client Portal.
- Scroll down to Account Currencies and click on Manage Currencies.
- Select the Currencies your Maxio account is configured to accept.
5. Add the Maxio Integration
- In FlexPay's portal, go to Account Setting > Integrations > Maxio
- Click on the Add Maxiobutton
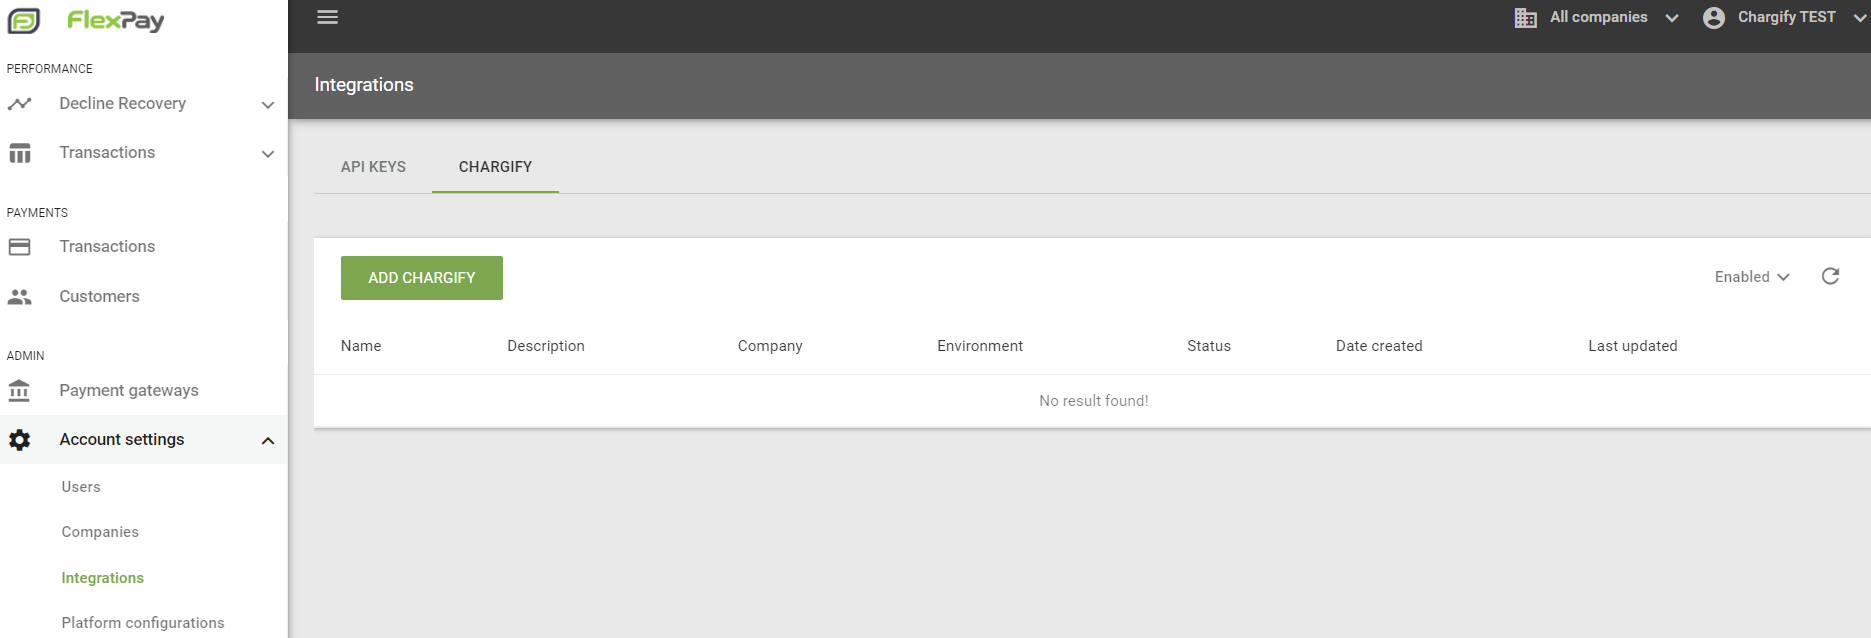
- Enter the information in the Manage Integration Point page
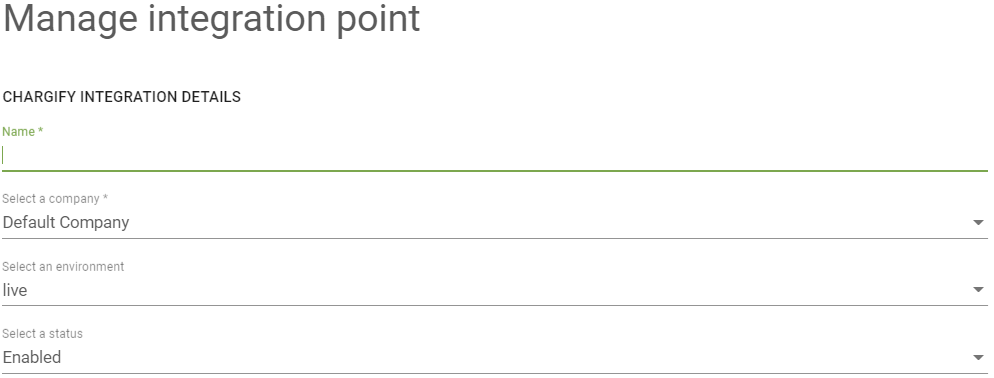
MaxioIntegration Details
- Name: Configuration name (we recommend you use the Account Name you have in Maxio)
- Company: Choose the appropriate company from the dropdown list.
- Environment: Options are “Live” and “Sandbox”. Please select “Live”
- Status: Options are “Enabled” or “Disabled”.
When an Integration is set to Status “Disabled”, the Webhook and FlexPay Listener will be disabled on Maxio's end AND FlexPay end. However, transactions that are already scheduled to be retried at a future date in FlexPay will still run. In order to stop this from happening, you must delete the API key provided to FlexPay.
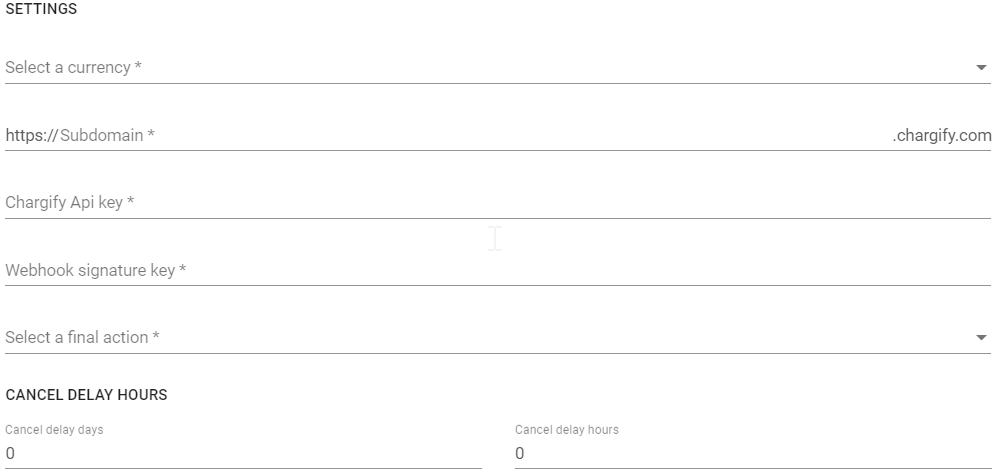
Settings
- Select a currency: Please enter the currency as noted on Step 1.1.
- Subdomain: Please enter the subdomain as noted on Step 1.1.
- API key: Please enter the key created on Step 1.4 of this guide.
- Shared key: Please enter the value gathered on Step 1.2 of this guide.
- Final action: If all retries for a payment fail, your options are:
- Cancel subscription – the subscription will transition to the ‘cancelled’ state and it will cease to accrue any new charges
- Mark as unpaid – the subscription will transition to the ‘unpaid’ state, but it will continue to accrue new charges
- No action: doesn’t update the Subscription status
- Cancel Delay Hours: the action selected in the previous step will occur at the moment of a hard decline PLUS X-Days and X-Hours as shown below. NOTE: If you leave the settings at 0 days/0 hours, the action occurs immediately.
- Once completed, click Add Integration Point
- The FlexPay webhook URL will be displayed. Take note of it since you will need it in the following section
6. Configure Maxio Webhooks
We need to configure a Maxio webhook and add an endpoint to send transactions to FlexPay.
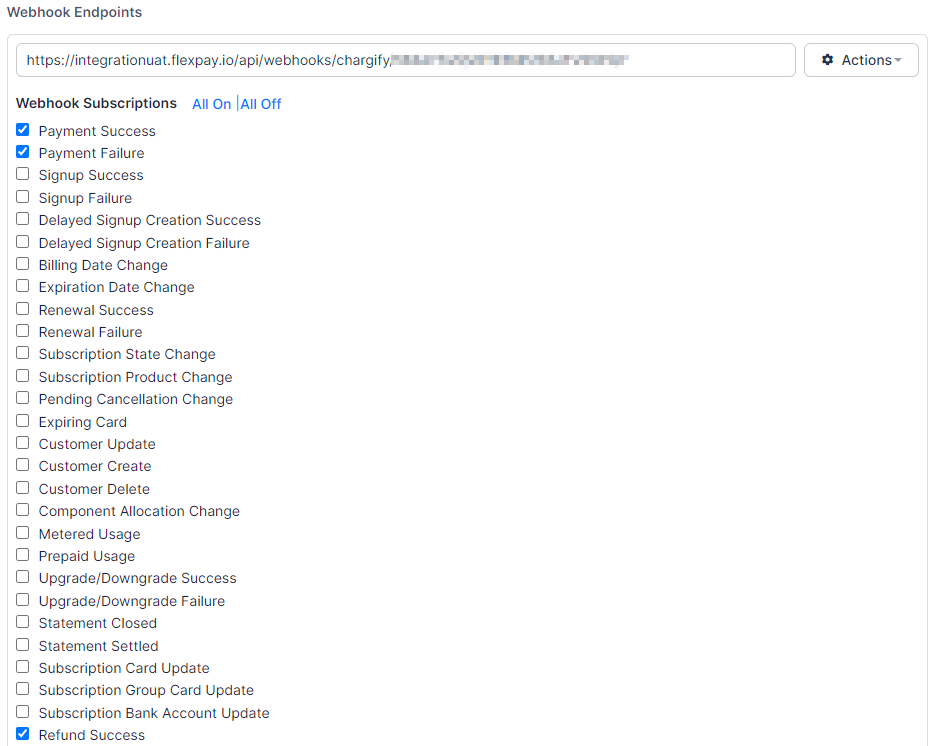
- We need to configure the Maxio Webhooks using the Webhook URL provided by FlexPay. Go to Configs > Settings using the navigation menu. Then Select the Webhooks menu. Please make sure the checkbox under Webhooks are enabled is checked and click on the Add New Endpoint button.
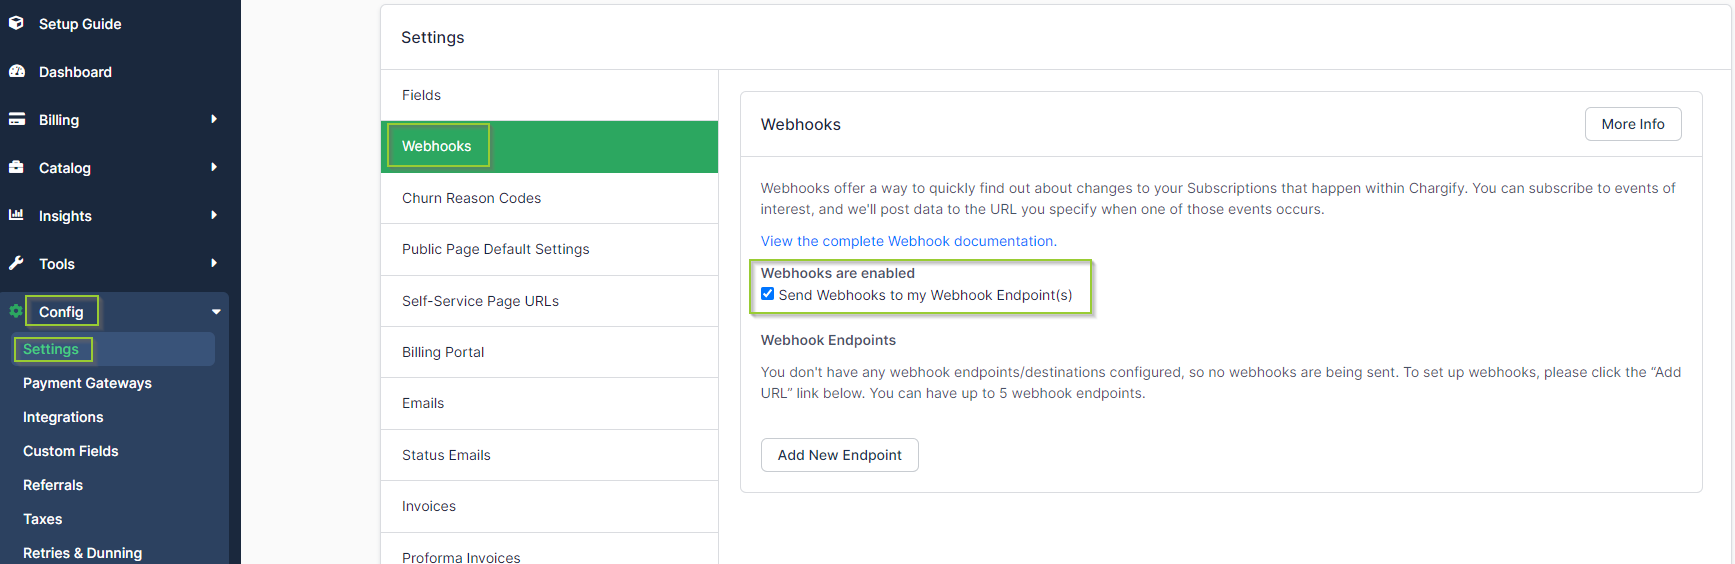
- We need to add the FlexPay Webhook URL provided by FlexPay. In the Webhook Subscriptions list we need to check the following items: Payment Success, Payment Failure, and Refund Success. Click Save.
- You can test the configuration by clicking on “Actions” and the “Test” button. A successful message will be displayed.

Updated over 1 year ago